What's up? I seem to have a pattern right now to post on Mondays or sometime at the end of the week. So... Here's another quick tip for carpet cleaning! Switch from strong, stinky chemicals to something as plain as good ole H2O and see what it does for you. We have an elderly pooty tat who we love dearly and want to make sure he stays healthy. I know he appreciates this change in cleaning.
I use a tea pot to boil some water for the steam cleaner. I let it sit for a minute or two before pouring it in the canister to the steam cleaner, then add warm water to fill the canister up. I have found that it works very well on our beige carpet upstairs. I got a lollipop stain out of the carpet this morning! Do you have any DIY remedies for carpet stains in your home?
Monday, June 2, 2014
Tuesday, May 27, 2014
Use Olive Oil Spray To Clean Stainless Steel!
Good Morning on this lovely Tuesday! Two loads of laundry done, child at school and one errand completed already! It's a good day. :)
Hope you had a wonderful holiday weekend and took time to reflect on those who served in the military. Our weekend was great! Time to ourselves, time with friends and family. Pool time. Cook out! It was so nice!
Just thinking about how filthy our kitchen appliances get and are and I wanted to share a super cheap way to clean them. I was buying super expensive cleaners for the stainless steel appliances and was looking for something a little cheaper. I found a tip to use olive oil so I tried it but found that the olive oil in a spray can works best for me. It's only a couple of dollars as compared to the $10.00 or more actual cleaners.
Hand prints! Uggghhh!
I spray it on a microfiber cloth to apply it on the surface. I use moderate pressure when applying.
My pictures are very shiny and not the most clear but it comes out nice and shiny.
There is my tip for the day. Maybe you will give it a whirl!
Hope you had a wonderful holiday weekend and took time to reflect on those who served in the military. Our weekend was great! Time to ourselves, time with friends and family. Pool time. Cook out! It was so nice!
Just thinking about how filthy our kitchen appliances get and are and I wanted to share a super cheap way to clean them. I was buying super expensive cleaners for the stainless steel appliances and was looking for something a little cheaper. I found a tip to use olive oil so I tried it but found that the olive oil in a spray can works best for me. It's only a couple of dollars as compared to the $10.00 or more actual cleaners.
I spray it on a microfiber cloth to apply it on the surface. I use moderate pressure when applying.
My pictures are very shiny and not the most clear but it comes out nice and shiny.
There is my tip for the day. Maybe you will give it a whirl!
Wednesday, May 21, 2014
ABSTRACT Angry Birds Cupcakes!
My family was sitting on the front porch two nights ago listening to my husband playing guitar and a bird was squawking from a tree so loudly that my husband said, "Man, that bird sounds angry!" Our two boys looked at each other and then the four of us were cracking up. ANGRY BIRDS! haha. I don't even really know how to play the game but the kids love it! It made me think of our youngest's last Birthday. He wanted Angry Birds so I made Angry Birds cupcakes.
Now I am no expert at cake decorating. Here was my go at cupcakes and I call it ABSTRACT Angry Birds! By the time I got to the Bad Piggies I called it quits. I ran out of black and white icing. The little ones could tell what they were and that was all that mattered! Have you ever botched cakes or cupcakes and made it work?
Tuesday, May 20, 2014
GRRR! Ink On Carpet?!?!?
Soooo, this is one of the stairs on our staircase. The carpet has seen better days and our youngest is a sneak and took an ink pen to the carpet. Nice. He once tried to connect the dots on my parents' dog(Dalmatian) with a marker but had never touched the carpet until now. HMMMM!!! Now to find a solution to the ink marks. I have some ideas on how to get it out of the carpet. So time to test those OR is it time to remove the carpet and stain the stair case like I have been dreaming of?!?!?! That is the question! Have you ever removed ink from carpet?!?!?!
Monday, May 19, 2014
DIY - Staining A Privacy Fence
HAPPY WEEK! Hope this finds you happy since it's a new week!
How are you doing? I'm feeling accomplished at the moment. A week ago last Friday I got one of my most grueling jobs done and I finished it before the neighborhood pool opened this weekend! Yippie! I may be a Stay At Home Mom but I keep it BUSY staying at home!
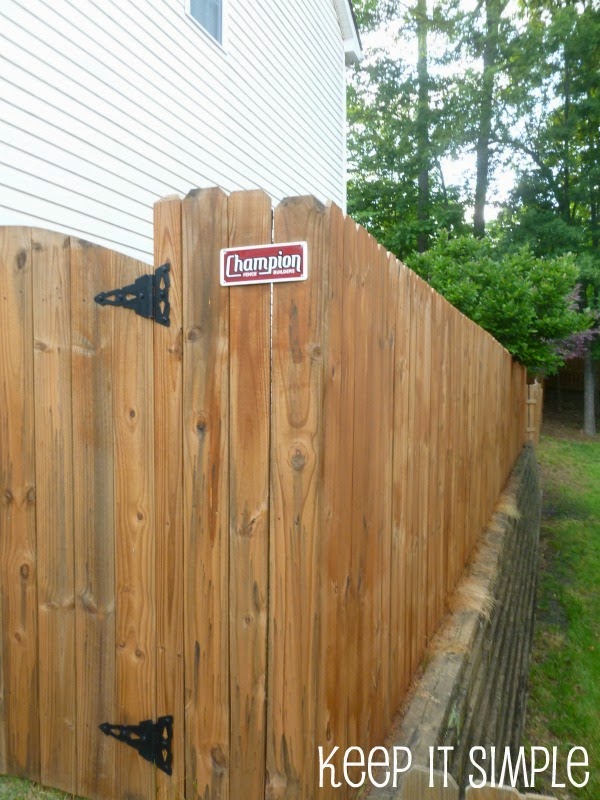
Below is a BEFORE and AFTER but the after wasn't even totally complete because I applied a second coat of stain on after taking this picture. We chose a cedar stain to give a nice rich, natural look.
For a DIY Cleaning & Staining your fence job you need:
Cleaning Supplies
Either a pressure washer with cleaner OR if you are like me, I used a car washing broom on a stick (you get them at any hardware store!), a few water hoses and a spray gun and cleaner that is good for wood.
I didn't go with a pressure washer because our fence is only 2 years old and everything I read said it's not necessary to pressure wash if it is 2-3 years old. The fence wasn't that dirty to begin with.
I used a wood cleaner made by BEHR that you mix with water. In cleaning the fence, you need to wet down the fence first, mix a half a cup of cleaning solution with water to make a sudsy solution and scrub the fence with it. You are supposed to leave the solution on the fence for ten minutes before rinsing. I worked in panels and kept carefully track of my time so I knew when to rinse. This job took me two good afternoons to complete. I worked on the inside of our fence first so I could contain our 4 year old. The second day I did the outside of the fence but got permission from my two neighbors before going in their yards to do it. :) We have wonderful neighbors so I didn't think there would be any problem.
Staining Supplies
an electric sprayer - I used a Wagner one that was $50.00
a wide paint brush for drips
measuring cup or cup with handle for pouring the stain in the canister to the spray gun
baby wipes for clean ups and spills on cup
ladder and enough electrical cords - I had to go buy one extra, a 3 prong one to fit my one extension cord. I needed two cords to get to the outside of the fence.
As for staining, that took me four days total. Note: You must wait 24-48 hours before staining after cleaning the fence! There is a definite technique to staining and using a sprayer. I sectioned off the job, doing the inside of the fence first while our four year old played in the yard. I did seven panels the first day and that was really a day of trial and error. It took me that long to get a real system going for how I would stain and it was a lot of stop and go to refill the canister. Oh I also recommend wearing gloves! The second day I finished the inside completely. Then I did one side on the outside that I had to use a ladder to reach. It was a lot of up and down that day. Next I did the outside of the fence all around the back side of the fence. I love the way it turned out. It has a nice rich color that turned out nice and even. I don't feel like the pictures do it justice, The fence looks great!
I also did the neighbor's fence above to the right. The stain looks a little different because the wood was a different type.
We're really happy how the DIY stain project turned out! It was a tiring job but gave me a great work out and a lot of satisfaction. I'd recommend doing it yourself if you have the energy and the time.
Wednesday, May 14, 2014
Dirty Clothes - What's YOUR System?
DIRTY CLOTHES! It's that dreaded task! I know everyone has a system. What's YOURS?
I try to keep my system really simple now. I used to detest laundry to the utmost degree! I felt like I could never get a handle on it and it was always piled up and non-stop. I felt like if there was something in the hamper then I wasn't doing my job or something. I used to be this way with the bathroom trash cans too. I was always trying to keep the hampers empty.
Not sure why I had this attitude but ever since becoming a full time stay at home mom my attitude has changed. I'm slowing the pace to try to enjoy our kids more and enjoy life and live! I know it must sound crazy but simplifying even them most mundane tasks has helped me. It's more freeing.
Everyone has their own way of doing things and different things work best for different people but what is working for me is as follows:
I try to keep it simple! To cut costs on water, I do all laundry in one or two days. If I'm not at home all day to constantly be folding laundry then it takes two days to finish. I used to be that person who would have to wash a load multiple times because I was trying to do too much and do laundry too quickly and I'd get tired, go to bed and the load would sour. Now I take my time and don't put a load in the washer until I'm ready to deal with it.
I do laundry on Mondays, this way I can enjoy the end of the week with my kids and not have to deal with folding and putting laundry away. Weekends are free of laundry! It's working out really well. So on Monday mornings, I take all four of our hampers down to the laundry room and sort and wash. The laundry gets folded as it comes out and it's separated into big laundry bags and put away. I be sure to put it all away at the same time, that way I only do it once and I'm not constantly putting away loads of laundry. If we get other dirty clothing, it sits in the hamper until the next Monday when I start the process over. I have been doing this for months now and really, really like. This is my process improvement! YAY!
Friday, May 9, 2014
A Basket Case - A Basket From My Mom's Garage!
How is it going? Happy Friday! Hope you had a great week! It's been a really busy week here. Well I say busy but my pace has slowed down a lot. I have a lot of projects I am working on but I am taking my time to stay focused and do one at a time. If you've read any of my posts before, you know I am all over the place with projects. Currently I am working on a BIG outdoor project and there is a learning curve plus I can have to have good weather to work on it. Today we had a little rain so I got a much needed break! That project will be coming soon!
So here's a basket I scored from my mom and dad's garage! My mom and I share a love for baskets. She has a ton that she used to display in her kitchen but isn't using all of them anymore so I got to take my pick!
I picked thiiiiiis one because it had cool wooden handles and a nice round shape to it.
I got it home and immediately found a place for it! I put it in the reading nook in the bay window of the dining room. Of course the reading nook is mostly used by the cat right now. I might paint it but just haven't quite decided. What do you think? Should I paint it or leave it?!?!?!
Friday, April 25, 2014
Installing DIY No Soliciting Sign On Brick
Good morning and HAPPY FRIDAY!!! Hope it's been a good week. Here it has been great. I can hardly walk today but it's for good reason. The past two days I've spent cleaning and prepping our wooden privacy fence so that I can stain it next week. I did the inside Wednesday and the outside yesterday. Being outside so much has been wonderful. Hope you get to spend some time outdoors this weekend!
So I wanted to follow up with the No Soliciting sign I made. We have a brick façade and I had never hung anything on brick before so I took some time to research to find the best approach. I found brick clips but wasn't sure how stable one would be. I ended up purchasing a hook that is made just for hanging on brick. I got it at Lowes and it was brass but I painted it with a good old Black Rustoleum paint so it would match the front light fixtures.
Anyhow the hook came with two screws and a drill bit especially for drilling into mortar. It was surprisingly easy! The mortar was actually pretty soft to drill into once I got the hole started. So here it is!
I have noticed that I haven't had anyone ringing the doorbell since I hung it up. Not sure if it's coincidence or the sign but I hope it doesn't offend anyone and simply does the job! Have a great Friday!
Monday, April 21, 2014
Spring Is In The Air!
YESSS! It is so nice out today! Lately it has been a bit on the yucky side and cold on this end. How's it going? I'm sorry I've been MIA but for the past week I was out of town working with my dad and grandfather on my parents' house. What an awesome experience it was to work on big house projects alongside of my dad and grandfather. I learned so much! I learned how to drive my dad's riding lawn mower and how to take down gutters, replace wood and rehang gutters. I learned how to apply mortar and then grind it down and I did lots of sanding and painting and cleaning of fencing. It was great! Now that I am home again I have some projects staring me in the face in my own house. For today I just wanted to share a small touch of Spring decorating for the season! I love Springtime! Do you have any Spring decorations you put out this time of year? Hope you had a great Easter! Have a great day!
Friday, April 4, 2014
April Showers Bring May Flowers - Umbrella Door Decor!
TGIF! Happy Friday to you! What have you been up to? Have you done any decorating or updating lately? The weather here has been gorgeous this week and I have to admit that is one perk of being home with my kids. When it's nice, we are outside! Between yesterday and today I've spent most of the days out doing yard work. Six bales of pine needles spread, five bags of leaves raked and lots of sticks picked up by the trash today. Flower bed weeded! It's been productive to say the least and the kids had a ball playing with water guns and soccer balls!
So onto my latest little project... It's an umbrella bouquet for the front door! I found it on Random Thoughts!
I found an adorable teal umbrella for cheap (to contrast with the navy blue door) online and flowers from Michaels half off, plus two coupons and ribbon I already had to boot! Simple enough, it just gets a little smashed when the storm door is closed. It's okay though cause when you open the door front door with the storm door closed we get to enjoy the arrangement on the inside of the house. :)
This project is so simple and fitting for this time of year. My mom did one for her door too. She has a yellow or hunter green front door and got a light green umbrella with a wooden handle and pink toned flowers. Beautiful too. Wish I had taken a picture because I had it hanging on my door last weekend!
A little smashed but that's okay :)
I'd love to hear what your last decorating project was! Have a great Friday!
Subscribe to:
Posts (Atom)