Monday, July 21, 2014

DIY No Sew Boy's Grommeted Valance

Monday Monday! Hope yours is good. It's a little gloomy here with thunderstorms. Uggh I had caffeine last night and it kept me up waaay too late. GRR! I should have known. I rarely have caffeine anymore and it affects me too much when I do now.
 
SO I wanted to share my son's bedroom valance. It is a very simple one and I made it. His room has gone through a recent redesign and the old curtain had to go.
 
For this simple window covering I used white duck cloth a friend gave me. :)
 

Below I cut the duck cloth to the desired size. I made it a little longer than the window to have room for folds with the grommets attached. I took a wooden car I had and measured out several cars. The cars below are facing the opposite direction from my finished curtain because this was my first go at it and the only process picture I had of hand drawing the cars.


I used toll paints. I had a blue and gray color I mixed to get a navy blue.

 
I used our playroom curtain to measure the location of the grommets.

I drew the circles and cut two slits before cutting out the circles.

The grommets snap in place very easily, adding a simple and clean touch! I bought them at Hobby Lobby years ago and they are brown if you can't tell from the pictures.

 
I had to cut a little off the bottom of the cars because I had an accident and got a spot of paint on the white area below one of the cars. Boo! I think it turned out okay though!

So there you have it!

Thursday, July 17, 2014

Organizing Food

Can you believe it is Thursday? This week has flown by. Really the whole summer is scooting on pretty fast. I would love it if summer would just slow down some though, it's my favorite time of year!
 
So here is a little organizational tip from our pantry to yours. You might think I was a little nutty by numbering cereal boxes but one of my pet peeves is people in our house opening two of the same thing before one thing is completely gone. It just bugs me.  
 
For example, someone opens a box of cereal of Rice Krispies. They eat one bowl and next thing you know, a second box is open too. I used to store alternate boxes of items up high so we would know not to do that. With the numbering system, it's just unnecessary! We do this with Milk in the fridge too. I usually buy 3-4 gallons at a time. I buy in bulk but we don't want all of them open at once so numbering has nixed that problem all together. The family has been on board for quite some time with this. 
 
So I number them 1 to 2 or 3 or 4 and we know what order to use something until it's gone, then go to the next. Try it! You might like it!  
 

Wednesday, July 16, 2014

Staining A Staircase Railing

Half the week is over and I hope you're having a good week. Mine has been good but I'm feeling zapped from the sun at the moment. Well here is yet another project I did while the kiddos were away... I had been wanting to do this one for years and was finally able to "get her done"!
 
Staining the railing to our stairs has made a huge impact on the feel of our house.
 
I simply taped it up, sanded lightly with a hand sander and painted on the stain.
 
I used a small chip brush and a can of Miniwax Poly Shades stain in Bombay Mahogany. 
 
It took two days to do! Not too shabby!
 
  
WARNING! This post contains LOTS of pictures!
 
 
This is a BEFORE and AFTER of the staircase railings.
 
The before was an orange wood but we wanted to match the dark hardwood floors. 
 
 
BEFORE
 
 BEFORE
 
BEFORE
 
I used lots of tape to mask out the areas I didn't want painted.

Using my drill I pulled this hardware out and painted it silver from the brass it was before.
 
AFTER
  
AFTER

AFTER


Tuesday, July 15, 2014

Keeping Pool Towels Handy!

Before I get to my little organizational post, I have to share what I witnessed on my way home from the gym this morning! It put a huge smile on my face and made my morning!
 
On my way home as I was cutting through a neighborhood, I got behind a cute little car with a dog hanging its head out the window behind the driver's seat. That was funny to see but the best part was pulling up beside the car at a stop sign. I pulled up next to the car when the driver was turning right and I was making a left. As I was waiting for traffic, I looked over at the car and I noticed the dog was a beagle and was wearing goggle sunglasses! I swear the dog was smiling too. It was the cutest thing ever. I started laughing and the woman and I waved to each other smiling. I wonder how many people they make smile!
 
Anyway I haven't seen something so cute that caught my attention in a loooong time. Too funny!
 
So now shifting gears and onto my post... Last night I took my kids to the neighborhood pool for a quick dip and it occurred to me that it's a pain gathering all our pool stuff. It takes the three of us FOREVER to get out the door!
 
I keep a "pool bag on wheels" holding all kinds of toys in the laundry room(next to our garage) so it's easy to throw in the back of the car when we go to the pool. I started thinking that for the summer why not store the towels in the laundry room too. Huh? Why don't I think of these things sooner? These are the little things that seem so silly but when you think about it, why not?!?! It makes perfect sense to keep them downstairs. I have the room to do it!
 
1. I wash and dry the towels more during the summer.
2. I'll avoid running up and down the stairs for towels.
3. It makes it faster to get ready for the pool.
4. Less chaos keeps everyone happier!
 
It's a win win to have the towels ready downstairs.
 
Upstairs Linen Closet Where "Pool" Towels Are Normally Kept 

Laundry Room Where "Pool" Towels Are NOW Kept During  The Summer!


It just makes more sense! Are there things like this that you find make life easier for YOU? What kinds of things have you changed up or done??? Hope you have a great day!

Monday, July 14, 2014

Painting Speaker Covers For A Living Room

Oh my gosh I feel like I've been THE worst procrastinator on this job and why? I do not know why. I guess I dreaded the prep work. Well I do have a couple of reasons.

Okay so it started with us getting speakers installed in the living room walls to watch TV and ordering speaker covers. many years ago. We wanted them to match the color of the walls. I painted them using an aerosol mixing can (needed to thin the paint to spray) bought at a hardware store. You add a little water to a jar, attach it to an aerosol can and paint. It worked okay for two speakers but the third came out blotchy. The can clogged and the speaker cover was COVERED and the holes were clogged so I used a tooth to pick paint out of the holes when it dried. Plus it was dented on the corners where it was forced in the wall. It looked terrible. It has been a major eye sore! Anyone could see it when they watched the TV.

BEFORE

Finally my hubs ordered a new speaker cover. After two tries with new aerosol cans, and failure, I decided to use my electric spray gun. Awesomeness! The set up took a while. I poured paint in the canister and added warm water until the paint was thinned well enough to spray a test sheet of card board smoothly. After a few tries, it worked great! It took all of two minutes to spray the speaker cover! It looks so nice compared to the first attempt which was on the wall for so many years.

Take a look. Basically I wished I wouldn't have waited so long to do this little project. It has made a big difference in how we look at the speaker wall now. :)

 AFTER

Monday, July 7, 2014

Chalk Painted Child's Table

Happy Monday! Hope you have a happy Monday!
 
I got a good, early start on this Monday so things are looking UP!
 
Yet another project BEFORE and AFTER


Have you ever made or used CHALK PAINT? It is AWESOME! I know you can buy it in a can but I mixed up some myself and it was superb! This was my first go at it but I really, really liked it and it was so simple to concoct! I did have some trial and error with this project but the final result was a positive one. YAY!
 
Chalk Paint Recipe
 
Ingredients
Latex paint of your choice
Warm water to mix
Plaster of Paris - I purchased a dry bag at Michaels. It can be found in craft stores or hardware stores!
 
Instructions
I used a paint cup from Dollar Tree.
I drew three measurement lines on the outside of the cup about an inch apart (try and guage how much paint you'll need to make you marks).
I poured Plaster of Paris to the bottom line. I added a tablespoon of warm water to the Plaster of Paris mixing and adding warm water until it was a nice smooth thick pasty consistency. I then added paint to the third and top line, mixing until the paint was blended with the Plaster of Paris.
 
 
Here is the kid-sized table my mother-in-law gave us for our kids. Her children used it when they were little so I think it's special in itself. I won't go and date us but it is pretty old and I thought it could use a nice, simple update to modernize it somewhat. It was in great condition.
 

The sanding in the garage began!


I sanded all parts to the table and chairs with my hand sander.
 

My first go at painting didn't go as well as I planned. I simply didn't get the Plaster of Paris mixed well with the paint so as I painted I kept finding white particles on the brush and on the furniture. I tried to capture it in the picture but not sure it's clear. Oh yeah, I used leftover paint from painting our front door too! I'm all about using leftover to conserve and save money. :)


Fun times, so BELOW I took everything back outside and made another batch of chalk paint and started over. I re-sanded everything and repainted!

 
For the legs, I wanted to go with a "dipped leg" paint look so I measured up about four inches and taped the legs. I liked how the tape looked and wondered if I should have actually painted the areas where the tape was to have two stripes and not the dipped look.
 

I used a light blue paint leftover from our bedroom walls. I think if turned out just fine.
Oops - the green painters tape in the background "photo bombed" my table shot!
 
 
A simple paint job made a big difference with this little table! Chalk paint gave the table a great textured, chalky kind of look and feel! I will definitely try chalk paint again! Let me know if you try chalk paint yourself! I would love to hear about your experience!
 

Sunday, July 6, 2014

Rescreening Windows

So in a little while I'm hitting the highway for a road trip to get our kids who have had a fun last week visiting their grandparents. During the week this mama has been knocking off tasks from my To Do list. I've done multiple projects and I'll eventually share them all with you.

Here is one minor project that took about fifteen minutes, it was simply making the time and putting forth a little effort.

It is so simple to change out window screens. My mother-in-law taught me how easy it was a few years ago. I would have thought you'd have to fork out money to buy the entire framed screen or something but maybe that was just me and never putting much thought into it!


Supplies you need
Screen - it comes in a roll and is found at the hardware store - I used Clear Advantage and I got it from Lowe's or Home Depot.
Screen spline - I bought 140" Diameter and 25' long (for multiple screens)
Scissors
Box cutter
Screen roller tool - found in screening supplies at hardware store

*******************************************************************************


First you gently slide the screen out of the window.They are typically very easy to get out, just use common sense about how to pull it. It took me a few tries at first to figure out how to get one out of the window. HA! ;) Yes a few years ago, I replaced every screen on all the windows. I'm telling you it is an easy job and you can do it watching tv!


Okay, so next you slowly pull out the screen spline and the old screen will come out of the frame with a little force.


So once you are ready to install the new screen, cut a piece of screen and be sure to leave about an inch to an inch and a half extra overlapping the frame. I used this piece because this is what I had left from one roll but it worked. It wasn't quite an inch extra all the way around as you can see.


Lay the screen over the frame. Next cut your spline. I measure it out and wrap it all the way around the frame using only one piece. It's not necessary to make cuts and use four pieces for each side of the frame. The spline will curl around the corners with no trouble.


Once you have your screen laid out and your spline cut, start rolling the spline, keeping the screen taut as you go. It takes moderate pressure to get the spline in the slit.


After the spline has been inserted all the way around the frame, take your box cutters ( I couldn't find mine so scissors worked too) and watch those fingers cutting the excess screen!
There you have it! It's super simple and helps keep the bugs out when you open your windows. OR if you're like me and like uniformity and the "not so dry rotted" look, you might want to give this a shot!


I’m linking up to the Something to Talk About Link Party today.  Go on over and see all the fabulous diy, crafts, furniture makeovers and more.

Friday, July 4, 2014

A Basket Case - Recognize That Basket From My Mom's Garage???

Happy Fourth of July! I hope you have a great holiday weekend and stay safe!
 
It has been an unusually quiet week here. My kids are away visiting their grandparents and my husband has laryngitis. Needless to say I've been hitting it hard trying to get as many projects accomplished because I know next week will be a different story after the kids return home.
 
So here is one small project I did. I got this round brown basket from my mom's garage a couple months ago. It sits in the bay window of our dining room in a designated sitting area.
  

After looking at it for a couple of months I decided to paint it. I know there is no going back once I paint it but there is always more paint and I can change the color if I decide to! I really wanted a fresh, more modern look to the basket. I found some adorable beachy looking baskets with navy blue stripes at Target that were my inspiration for color! I wanted contrasting colors on the basket but nothing too "matchy matchy" for this particular room.

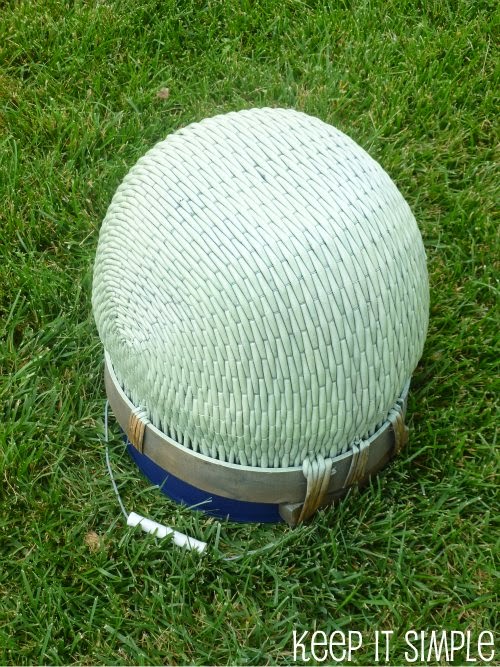
I painted the bottom portion of the basket with Krylon Indoor/Outdoor Gloss in Celery. So it isn't white! I sprayed in the direction of the pattern and the paint went on with a nice smooth coat.
See below - I sprayed using strokes left to right and back and forth to get even coverage.
Sitting the basket upside down over a bucket allowed it to dry without being touched.
 
This is the sitting area. 
 I painted the inside of the basket too! 
 After taping the inside and outside areas, I painted the handles in Valspar Satin Indigo Streamer.
I think it's a keeper! What do you think? Have you painted any baskets lately?

Thursday, July 3, 2014

Painting & Staining - Lots going on!

Hmmmmmm. I'm thinking I've got too many projects going on at once but I'm really trying to take advantage of the weather and my kids being away visiting their grandparents. Right now it is sunny out and I want to get as much of my spray painting done before it rains. I am getting to the point though where I am walking around aimlessly because I can't focus on one thing. Hmm There are several things in different stages and I'm waiting on paint to dry. Here is what I am talking about!

I'll share all when they are complete! Happy Thursday!