Tuesday, July 1, 2014

Instructions To Giving Tie Dye A Whirl!

Kick starting the summer with tie dye has been fun! I took this picture because I was so excited about the pattern. This was just after the rinse job BEFORE the shirt was dried and I was hoping it would turn out half way decent. I think it did! I've done tie dye before but the patterns never turned out so great.
 
I will show you how to get this classic spiral design. It is very easy!
 
What you need to do this project:
white t-shirt
tie dye kit - comes with rubber bands, rubber gloves, soda ash, and three bottles of dye
large bucket
 
I used a kit by Jaquard.
 
 
I am using a tank top BELOW to show you the BEFORE steps because I forgot to take pictures as I was going through the process. I was a little excited! Before you do anything follow the directions that came with the tie dye kit. I washed my t-shirts with regular detergent on cold before I did anything. Next you mix soda ash with warm water and soak your shirt for 20 mins. Follow the directions on how much to use. I made 9 shirts total and the one batch of soda ash was perfect!

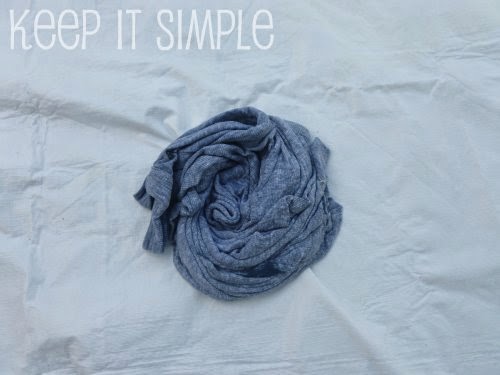
Once you have soaked the shirt in soda ash for 20 mins, remove it and squeeze the water out of it over your bucket (you can reuse your soda ash mixture for future shirts! Next lay the shirt out flat and grab a spot and start turning the fabric in a circular motion in one direction.

  Continue spinning the fabric until you have a cinnamon roll shape.
Here is a quick illustration of how to wrap the rubber bands and apply the color. It helped me when I was outside applying the dye so I made sure I put the colors in the right place.
 
Use 4 rubber bands crisscrossing them like below. Make an X with two and then use the other two rubber bands crossing one thru each X. Add warm water to the dye bottles (following the directions) when you are ready to dye the fabric. Apply the dye generously and overlap the color. It doesn't matter if it splatters or you get spots on the shirt. It adds to the fun of the design! After applying the dye, store each shirt in its own gallon size zip lock bag. Let the bags sit with the shirts for 48 hours. Once you are ready to open the bags, rinse all the dye out squeezing the shirt over the sink. Once you see that the running water is clear, you are ready to throw in the washing machine and wash. Follow the directions on washing your shirts in what temperature. I have read that you can wash the shirts in cold water or in warm water. I used cold. You can put multiple shirts in the wash too by the way!
 
For an added touch, I added Mickey Mouse using a template of the logo with a permanent fabric marker to the bottom left corner of my shirts after they were dry! These shirts were for a  Disney trip and I am not trying to sell them so it was a little personal touch for our family.
 
The shirts were a big hit at the parks. We stood out in a crowd which was awesome because could keep up with each other with no trouble! YAY for homemade tie dye!