Monday, July 14, 2014

Painting Speaker Covers For A Living Room

Oh my gosh I feel like I've been THE worst procrastinator on this job and why? I do not know why. I guess I dreaded the prep work. Well I do have a couple of reasons.

Okay so it started with us getting speakers installed in the living room walls to watch TV and ordering speaker covers. many years ago. We wanted them to match the color of the walls. I painted them using an aerosol mixing can (needed to thin the paint to spray) bought at a hardware store. You add a little water to a jar, attach it to an aerosol can and paint. It worked okay for two speakers but the third came out blotchy. The can clogged and the speaker cover was COVERED and the holes were clogged so I used a tooth to pick paint out of the holes when it dried. Plus it was dented on the corners where it was forced in the wall. It looked terrible. It has been a major eye sore! Anyone could see it when they watched the TV.

BEFORE

Finally my hubs ordered a new speaker cover. After two tries with new aerosol cans, and failure, I decided to use my electric spray gun. Awesomeness! The set up took a while. I poured paint in the canister and added warm water until the paint was thinned well enough to spray a test sheet of card board smoothly. After a few tries, it worked great! It took all of two minutes to spray the speaker cover! It looks so nice compared to the first attempt which was on the wall for so many years.

Take a look. Basically I wished I wouldn't have waited so long to do this little project. It has made a big difference in how we look at the speaker wall now. :)

 AFTER

Monday, July 7, 2014

Chalk Painted Child's Table

Happy Monday! Hope you have a happy Monday!
 
I got a good, early start on this Monday so things are looking UP!
 
Yet another project BEFORE and AFTER


Have you ever made or used CHALK PAINT? It is AWESOME! I know you can buy it in a can but I mixed up some myself and it was superb! This was my first go at it but I really, really liked it and it was so simple to concoct! I did have some trial and error with this project but the final result was a positive one. YAY!
 
Chalk Paint Recipe
 
Ingredients
Latex paint of your choice
Warm water to mix
Plaster of Paris - I purchased a dry bag at Michaels. It can be found in craft stores or hardware stores!
 
Instructions
I used a paint cup from Dollar Tree.
I drew three measurement lines on the outside of the cup about an inch apart (try and guage how much paint you'll need to make you marks).
I poured Plaster of Paris to the bottom line. I added a tablespoon of warm water to the Plaster of Paris mixing and adding warm water until it was a nice smooth thick pasty consistency. I then added paint to the third and top line, mixing until the paint was blended with the Plaster of Paris.
 
 
Here is the kid-sized table my mother-in-law gave us for our kids. Her children used it when they were little so I think it's special in itself. I won't go and date us but it is pretty old and I thought it could use a nice, simple update to modernize it somewhat. It was in great condition.
 

The sanding in the garage began!


I sanded all parts to the table and chairs with my hand sander.
 

My first go at painting didn't go as well as I planned. I simply didn't get the Plaster of Paris mixed well with the paint so as I painted I kept finding white particles on the brush and on the furniture. I tried to capture it in the picture but not sure it's clear. Oh yeah, I used leftover paint from painting our front door too! I'm all about using leftover to conserve and save money. :)


Fun times, so BELOW I took everything back outside and made another batch of chalk paint and started over. I re-sanded everything and repainted!

 
For the legs, I wanted to go with a "dipped leg" paint look so I measured up about four inches and taped the legs. I liked how the tape looked and wondered if I should have actually painted the areas where the tape was to have two stripes and not the dipped look.
 

I used a light blue paint leftover from our bedroom walls. I think if turned out just fine.
Oops - the green painters tape in the background "photo bombed" my table shot!
 
 
A simple paint job made a big difference with this little table! Chalk paint gave the table a great textured, chalky kind of look and feel! I will definitely try chalk paint again! Let me know if you try chalk paint yourself! I would love to hear about your experience!
 

Sunday, July 6, 2014

Rescreening Windows

So in a little while I'm hitting the highway for a road trip to get our kids who have had a fun last week visiting their grandparents. During the week this mama has been knocking off tasks from my To Do list. I've done multiple projects and I'll eventually share them all with you.

Here is one minor project that took about fifteen minutes, it was simply making the time and putting forth a little effort.

It is so simple to change out window screens. My mother-in-law taught me how easy it was a few years ago. I would have thought you'd have to fork out money to buy the entire framed screen or something but maybe that was just me and never putting much thought into it!


Supplies you need
Screen - it comes in a roll and is found at the hardware store - I used Clear Advantage and I got it from Lowe's or Home Depot.
Screen spline - I bought 140" Diameter and 25' long (for multiple screens)
Scissors
Box cutter
Screen roller tool - found in screening supplies at hardware store

*******************************************************************************


First you gently slide the screen out of the window.They are typically very easy to get out, just use common sense about how to pull it. It took me a few tries at first to figure out how to get one out of the window. HA! ;) Yes a few years ago, I replaced every screen on all the windows. I'm telling you it is an easy job and you can do it watching tv!


Okay, so next you slowly pull out the screen spline and the old screen will come out of the frame with a little force.


So once you are ready to install the new screen, cut a piece of screen and be sure to leave about an inch to an inch and a half extra overlapping the frame. I used this piece because this is what I had left from one roll but it worked. It wasn't quite an inch extra all the way around as you can see.


Lay the screen over the frame. Next cut your spline. I measure it out and wrap it all the way around the frame using only one piece. It's not necessary to make cuts and use four pieces for each side of the frame. The spline will curl around the corners with no trouble.


Once you have your screen laid out and your spline cut, start rolling the spline, keeping the screen taut as you go. It takes moderate pressure to get the spline in the slit.


After the spline has been inserted all the way around the frame, take your box cutters ( I couldn't find mine so scissors worked too) and watch those fingers cutting the excess screen!
There you have it! It's super simple and helps keep the bugs out when you open your windows. OR if you're like me and like uniformity and the "not so dry rotted" look, you might want to give this a shot!


I’m linking up to the Something to Talk About Link Party today.  Go on over and see all the fabulous diy, crafts, furniture makeovers and more.

Friday, July 4, 2014

A Basket Case - Recognize That Basket From My Mom's Garage???

Happy Fourth of July! I hope you have a great holiday weekend and stay safe!
 
It has been an unusually quiet week here. My kids are away visiting their grandparents and my husband has laryngitis. Needless to say I've been hitting it hard trying to get as many projects accomplished because I know next week will be a different story after the kids return home.
 
So here is one small project I did. I got this round brown basket from my mom's garage a couple months ago. It sits in the bay window of our dining room in a designated sitting area.
  

After looking at it for a couple of months I decided to paint it. I know there is no going back once I paint it but there is always more paint and I can change the color if I decide to! I really wanted a fresh, more modern look to the basket. I found some adorable beachy looking baskets with navy blue stripes at Target that were my inspiration for color! I wanted contrasting colors on the basket but nothing too "matchy matchy" for this particular room.

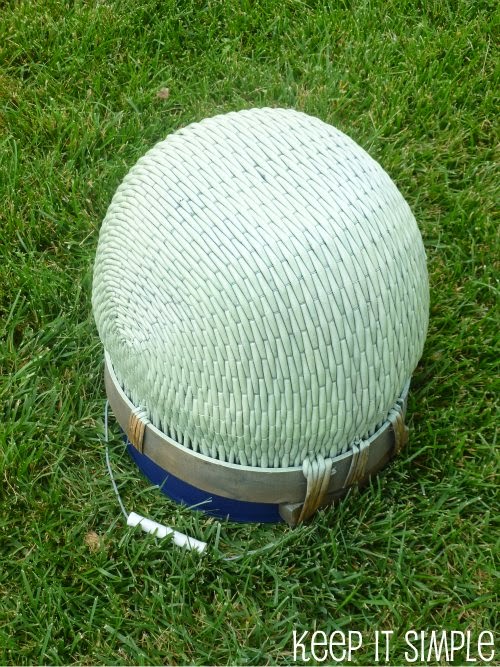
I painted the bottom portion of the basket with Krylon Indoor/Outdoor Gloss in Celery. So it isn't white! I sprayed in the direction of the pattern and the paint went on with a nice smooth coat.
See below - I sprayed using strokes left to right and back and forth to get even coverage.
Sitting the basket upside down over a bucket allowed it to dry without being touched.
 
This is the sitting area. 
 I painted the inside of the basket too! 
 After taping the inside and outside areas, I painted the handles in Valspar Satin Indigo Streamer.
I think it's a keeper! What do you think? Have you painted any baskets lately?

Thursday, July 3, 2014

Painting & Staining - Lots going on!

Hmmmmmm. I'm thinking I've got too many projects going on at once but I'm really trying to take advantage of the weather and my kids being away visiting their grandparents. Right now it is sunny out and I want to get as much of my spray painting done before it rains. I am getting to the point though where I am walking around aimlessly because I can't focus on one thing. Hmm There are several things in different stages and I'm waiting on paint to dry. Here is what I am talking about!

I'll share all when they are complete! Happy Thursday!


Tuesday, July 1, 2014

Instructions To Giving Tie Dye A Whirl!

Kick starting the summer with tie dye has been fun! I took this picture because I was so excited about the pattern. This was just after the rinse job BEFORE the shirt was dried and I was hoping it would turn out half way decent. I think it did! I've done tie dye before but the patterns never turned out so great.
 
I will show you how to get this classic spiral design. It is very easy!
 
What you need to do this project:
white t-shirt
tie dye kit - comes with rubber bands, rubber gloves, soda ash, and three bottles of dye
large bucket
 
I used a kit by Jaquard.
 
 
I am using a tank top BELOW to show you the BEFORE steps because I forgot to take pictures as I was going through the process. I was a little excited! Before you do anything follow the directions that came with the tie dye kit. I washed my t-shirts with regular detergent on cold before I did anything. Next you mix soda ash with warm water and soak your shirt for 20 mins. Follow the directions on how much to use. I made 9 shirts total and the one batch of soda ash was perfect!

Once you have soaked the shirt in soda ash for 20 mins, remove it and squeeze the water out of it over your bucket (you can reuse your soda ash mixture for future shirts! Next lay the shirt out flat and grab a spot and start turning the fabric in a circular motion in one direction.

  Continue spinning the fabric until you have a cinnamon roll shape.
Here is a quick illustration of how to wrap the rubber bands and apply the color. It helped me when I was outside applying the dye so I made sure I put the colors in the right place.
 
Use 4 rubber bands crisscrossing them like below. Make an X with two and then use the other two rubber bands crossing one thru each X. Add warm water to the dye bottles (following the directions) when you are ready to dye the fabric. Apply the dye generously and overlap the color. It doesn't matter if it splatters or you get spots on the shirt. It adds to the fun of the design! After applying the dye, store each shirt in its own gallon size zip lock bag. Let the bags sit with the shirts for 48 hours. Once you are ready to open the bags, rinse all the dye out squeezing the shirt over the sink. Once you see that the running water is clear, you are ready to throw in the washing machine and wash. Follow the directions on washing your shirts in what temperature. I have read that you can wash the shirts in cold water or in warm water. I used cold. You can put multiple shirts in the wash too by the way!
 
For an added touch, I added Mickey Mouse using a template of the logo with a permanent fabric marker to the bottom left corner of my shirts after they were dry! These shirts were for a  Disney trip and I am not trying to sell them so it was a little personal touch for our family.
 
The shirts were a big hit at the parks. We stood out in a crowd which was awesome because could keep up with each other with no trouble! YAY for homemade tie dye!


Wednesday, June 18, 2014

Giving Tie Dye A Whirl!

 
I'm sooooo excited! Nothing like kick starting the summer with a little tie dye! I'm not totally finished with the process but as soon as I complete it I'll share how you make this pattern! First I want to be sure it turns out nicely. Just super excited! Hope this finds you doing well. Happy Hump Day! 


Monday, June 16, 2014

Car and Truck Wall Plaques As Decor For Boy's Bathroom

How are you on this beautiful Monday? Hopefully you had a great weekend and are ready to start the new week. It's been productive here so far. I've gotten my workout in and already have a load of laundry going. Lots to do today so trying to get a head start!
 
I have been doing more purging lately than decorating. It has gotten to a point with our house where all the rooms are decorated and have been for a while and I'm trying to maintain and keep it clean and organized. That is a job in itself but I did find a little project to share.
 
Below is a cheap and easy way to decorate a wall. I did this a while back... I wanted to do something boyish in our kids' bathroom and didn't want to spend a lot of money. I didn't want anything that had framed paper because with it being a bathroom, I didn't want steam to ruin any picture I hung.
 
So I found two unfinished wooden plaques at a craft store then saw these unfinished wooden car and truck cuts outs. They had brass hangers at the top so they could be hung alone but I wanted to add a little more depth so I plucked them off. I painted the plaques and trucks using leftover white paint from the garage for the plaques and navy blue spray paint on the trucks.
 

I sanded the plaques to antique them on the edges then glued the car and truck on with wood glue and let sit over night.

Using 3M Velcro stickies I hung them on the wall over the towel rod. I think it goes nicely with the cars and trucks theme of the room. It's a very simple design for the boys!


Friday, June 13, 2014

Dining Room Table - Staged For A Different Purpose

Happy Friday to you! It has been a week here and it's not over yet! Our oldest is on the swim team for the first time ever and WOW is it an experience! I never did swim team as a child and it amazes me how many people it takes to run a meet and make it happen. It's pretty awesome to see it all come together on meet days! I'm very proud of our son too because he has come so far in his swimming. Not sure I could do a lap myself!
 
Getting back to the reason for my blog, I wanted to share my staged dining room table. I know it probably looks really goofy all set up every day with the place settings out. We are HORRIBLE and I mean HORRIBLE about piling things up on the table. It's a room you can pass through from the front door or staircase to the kitchen, and we were being especially bad about putting mail or just junk on the table.
 
 
The purpose of keeping the table set is to keep it nice and neat and not totally junked up. So far with the dishes and silverware out, we have managed to keep a single room fairly picked up. Sad isn't it that I've staged a room for this purpose?!? We tend to use the kitchenette more when it's just us and the kids. Do you ever put your china out for this purpose? Laughing Out Loud! Have a great Friday and talk soon! 


Monday, June 2, 2014

Steam Clean Carpet Without Chemicals!

What's up? I seem to have a pattern right now to post on Mondays or sometime at the end of the week. So... Here's another quick tip for carpet cleaning! Switch from strong, stinky chemicals to something as plain as good ole H2O and see what it does for you. We have an elderly pooty tat who we love dearly and want to make sure he stays healthy. I know he appreciates this change in cleaning.

I use a tea pot to boil some water for the steam cleaner. I let it sit for a minute or two before pouring it in the canister to the steam cleaner, then add warm water to fill the canister up. I have found that it works very well on our beige carpet upstairs. I got a lollipop stain out of the carpet this morning! Do you have any DIY remedies for carpet stains in your home?