Thursday, October 25, 2012

Add Some Flair To Your Cabinets With A Stylish Paper Liner


I'm so excited about how neat my bathroom cabinets look that I want to leave the cabinet doors open all the time. Well, not really but I do want to open them and take a peak at the little bit of eye candy when I'm in there. I just feel pumped when I've done something I have been wanting to do for a while! 

I mean, I have had this on my house to do list for a loooooong time. Sad huh. I have been browsing the kitchen aisles for a while waiting for some cool pattern of contact paper. I've checked out, Wally World aka Wal-Mart, Dollar Tree and Tarjay. I almost broke down and got a roll at DT even though I wasn't settled on the pattern. It was more froo-froo and ornate but I waited and I think this was worth the wait!

The floor of the cabinet was GROSS. Gross and stained from I don't know what. They just get like that after cans of crap sit there and rust.I was considering covering the bottom of the cabinet with cheap vinyl flooring tiles but I'm so glad I didn't. So are you wondering where I found this? It was one of the places I visited several times. Yes, it was Wally World. Can you believe it?

It's Peel and Stick Laminate covering. It's pretty cool stuff and washable, which is MOST important. Putting it down was a challenge but I DID IT!


I could have measured it out with a tape measure but impatient me didn't. I just stuck the roll in there, make marks with a razor blade and used scissors and a x-acto knife to cut. It's pretty forgiving but you want to be sure to cut a little more than you need to compensate for any shrinking that might occur.

So I flipped the roll upside down to figure out how big to make it. There was an awesome measurement graph on the backside so that was HUGE! I used it to fudge my measurements. Then cut it down.
It looks to nice and easy but what you don't see in my presentation (ha, sounds so formal and formal is soooo not me) is the mis-measuring and then the numerous attempts and the wads of two different pieces of paper before I got it right. Once I got it right, it just made the whole experience worth it!
If you try this at home, have patience, do it slowly and don't let sticky touch another area of sticky or you're DONE! It's a little tricky.


If you read this I hope you got some enjoyment out of it and please excuse the dusty cabinets. I didn't realize just how dusty they were until I saw these pictures! Everyone, have a wonderful Friday and a great weekend!


Sunday, October 21, 2012

Garbage Bag Ghost Covering A Bird Feeder

Today was an awesome day! Our little ones did a basketball clinic at our alma mater and got to slam dunk with the team players. Then they got to run through the smoke from the locker rooms and slap all the players hands on the court. What an awesome experience for little kids. It's all about seeing smiles on their faces!

This kitchen tall Hefty made their eyes light up once we got home. It's so simple, anyone can do it! I folded up a garbage bag and cut the whole top end off, to remove the red drawstring. Then I cut up one of the sides to split the bag. I covered the bird feeder and used about 4 pieces of duck tape on the back side to close up the bag. Once I had the bag up, I used a permanent marker to color in the eyes and mouth. My neighbors were probably wondering what I was doing on my step ladder!


On Halloween night, I'll drop a battery operated candle inside the bird feeder to light it up! The kids were so excited to see the ghost go up! Do you have any ghosts in your yard?

Friday, October 19, 2012

Bedside Medicine Tray

How has your week been? Hopefully GOOD! It definitely feels like Fall here and with the seasons changing our whole household has gotten the icky, snotty crud.


So the past three days I have have spent my time in bed or on the couch sleeping and catching up on movies and this little doodad below has come in handy for all my meds. Yes it just so happened to be a little Good Will DIY redo. :)

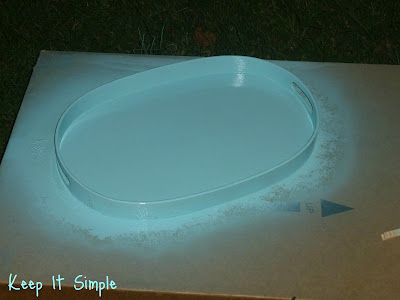
It started with this old wooden tray that had some sort of writing (maybe Chinese?) with pictures. It was pretty worn and had several stains but I liked the shape of it and I think it cost about $1.00.


I used a Krylon White Primer and let it dry.

Next I painted it Krylon Glossy Blue Ocean Breeze.

I think it turned out nicely and it sure has helped me easily take my meds up and down the stairs depending on where I decide to plant myself.


I'm sure I will find another good use for it too! Hope you have a wonderful weekend and stay well!

linked up at CraftyHappyScrappy


Thursday, October 11, 2012

Fall Into Autumn and Avoid the Flu!

Yeah my right arm is sore but not as bad as it has been after the flu shot in years past. Do you get the flu shot? A couple of years ago a nurse administering the shots advised us at work to get the shot in your dominant arm. You use it more therefore you'll work it out and it won't be as sore as it would if you got it in the other arm. Works like a charm. However I find it ironic to get the flu shot today and come home to a bunch of sickies at home. What a fun weekend I have to look forward to.
Are you getting your game on with Halloween decorating? My closest girl friends are all decked up but our neighborhood is really lacking. I feel like our house is lonesome with the ghost milk jugs from last year and the ghost lights and bat hanging on our front porch. What happened to the Halloween spirit?  There is just something so magical about it that I couldn't NOT decorate.


I don't like to overdo but here is a little fall decor to get us in the spirit. Ceramic pumpkins from the dollar store and mums from Michaels. Nothing fancy or too nick nacky but a little fall color adds warmth to the house.


What are you doing to decorate for the Fall?

Thursday, October 4, 2012

Recap: Beyblade Birthday Party

I'm backtracking to last month's big Birthday party. My son wanted a Beyblade Birthday so I did it up Beyblade style. Weeks before his party, I didn't even know what a beyblade was. It's a cartoon and they are spinning toys that battle until one stops. Little boys go nuts over them.

I did my research and we had a beyblade tournament for his party. As each child walked in the door, my son and I greeted them with these Beyblade lanyards I whipped up on the Cricut. I looked for trading cards to laminate but instead I used the cricut with a marker and did a pattern of the letters and used ribbon and velcro to make the lanyards. I wanted it to look somewhat official to get the kids hyped up.


I made 10 of them and did two sets of ones, two sets of twos, and so on. We gave the first child who walked in the door a number one. Then the next child a number one, then the next a two and so on. The ones battled each other, the twos battled each other, you catch the drift. The winners battled until we had an ultimate winner. Sure in my mind it would work, but in reality these kids just wanted to play and the tourney kinda of fizzled. It was fun though! That was the most important thing!

We set up two arenas for the kids to battle it out. They played in them at random. That wasn't so organized!

"Let It Rip" is what you say when you pull the zipper off the beyblade to make it spin so "LET IT RIP" was my mantle.


Party favors were a few pieces of candy and a small trophy for each child.


Red and Blue Streamers - No Birthday is complete without streamers!


Red and Blue confetti make a fun addition to a balloon. I was a little worried the stars would pop the balloons from the inside but they didn't. However the kids popped all the balloons by accident, so we wound up with a confetti explosion and stars all over the carpet. I am still finding stars!


More red and blue decor. Cut outs with the Cricut!


I think all the kids had fun but next year we are keeping it simpler!


Wednesday, September 26, 2012

Craptastic!

Crap, crap and MORE crap! My six year old would say, "That's a bad word, Mommy."  I usually don't say that word at home because of little ears but I found Craptastic fitting here. To finish off my last post, I am stoked about having all our papers filed. Working to keep on top of it now!

To simplify the filing cabinet, I made a tiny change to simplify even the most minor thing about filing. I used to keep all my tabs in different positions 1-5 on the file folders. If I had to make a new folder then I would spend time shifting all the tabs around. How ridiculous twas thee!

So I moved all my tabs front and center to keep all files uniform. Not a big deal, but yes a big time saver for someone who is way too particular for her own good.  Please don't judge!

This is a picture of the piles of crap I had collected around the house before I did the filing session. Nice huh. Laundry, two bags of paperwork, a small bin of paperwork... all the crap in the house that didn't have a home. I did however find a home for everything.

Here is a picture post crap. Post(after) my piles of crap, post the droppings of crap from our sick cat. I haven't been posting my projects this week because I've been trying to nurse my 14 year old cat back to health. Poor guy. A lot of people can take cats or leave em but my cat is my baby. He's been with me for years. Anyhow tonight I steam cleaned the carpeted rooms where he has been sick and this is probably the cleanest the carpet has been in a while.  How was that for random!?! Hope YOU are having a better than craptastic week!

Monday, September 17, 2012

What Style Are You? Take The HomeGoods Stylescope Quiz!

I just took a style quiz at HomeGoods and my result was "Sassy"! See two images below.
Photo: Looks Like
Photo: Boho Looks Like
I think "Sassy" fits more of what I want to be but I'm more of a chicken with color and fall into the category of classy. Heck I'm like that with the design of my blog too.  Take the HomeGoods Stylescope Quiz and see what you are! I'd love to hear!


Photo: Who is Classic

Sunday, September 16, 2012

Cricut CrAzY with Vinyl!

Yesterday we had a large crowd for our son's Birthday. I got a little carried away with vinyl and my Cricut cutter. Uh I think I got A LOT carried away! Just Scroll down.


See which tea was most popular!  I hand washed so I could leave the stickers on for a while. Whatever you do, Do NOT run through the dishwasher!


Can't believe I am showing you the next pix because it was overkill but I thought it would be helpful because people usually can't figure out our kitchen trash can. The trash can opens when waving your hand over its sensor. We didn't buy it for the sensor, it was  a purchase because of its shape. It's easy to shimmy a full bag out! We're dorks and research minor things like this.


Self-explanatory.


Yeah it was overkill but my dorkiness took over. I took the wall "help" down as soon as the party was over. My hub's buddy was making fun of them, that he half expected to see a sign in the potty room saying flush the toilet. Nah it would have read, "leave the seat down!"

Saturday, September 8, 2012

WHAT NOT TO DO!

I'll just go ahead and say it. I am an idiot. Or I feel like one at least. Queen of STUPID. Got myself into another situation!

If you have been reading along please take note because I offered some simple advice on an easy way to clean your car's floor mats.

Stupid is as stupid does! It worked on my cars mats but NOT on my husband's. Crap and now I have to make sure I didn't totally just ruin our washing machine. Please say a small prayer.
You see, my mats are smaller and have a fabric backing. His have a rubber backing and are pretty big and MELTED onto the inside of the washing machine. So now, at a desperate attempt, I am running the machine with warm water and vinegar to try and help loosen the rubber stuck to the inside of the tub. I am scrubbing and scraping to get the gick off. This is worse than accidentally washing a disposable diaper in the washing machine. Please tell me I'm not the only one who has ever done that!

See the black rim! I think my heart was in my throat when I noticed this. Doh!

These are actual flecks from the rubber backing. Oh I could kick myself.


let you know how it goes. :(

Monday, September 3, 2012

A Quickie DIY Burlap Curtain For A Block Glass Bathroom Window

Oh I am up WAY too early on a day off so what better to do than show you what I did yesterday. My husband is a little under the weather and so I have been taking care of the kiddos all weekend but I was able to fit in a little home decorating fun. We have a tub with one of those big block glass windows over it. I'm not crazy about how these types of windows look but I guess it skews things from the outside if looking in. ; )
When we bought the house, this bathroom was pale pink with a hand painted flower vine border around the top of the room. As soon as I could I changed it to make it my own. There were also big hooks on either side of the window with a piece of fabric draped along the top of the window. It reminded me of I Dream of Jeannie so I quickly took it down.


I hung a brushed nickel spring pressure tension rod and inserted inside. This is great because there is no drilling and if I change my mind about the curtain, it's easy to change out. I used a pack of silver curtain rod clip rings that I have had for a while. I hung a piece of burlap I had to see how long I wanted it.

I started cutting the length I wanted. No real system here. After I began cutting I took the burlap and using my t-square cleaned up the edges. I glued the wide strips of ribbon only after trying stitch witchery, which did NOT hold.


How is that for a quick DIY solution? I like the way the valance turned out. It still lets the light in and is a very casual addition to the room. Have you ever used burlap as a window treatment? What kinds of fabric makeshift piece have you used in lieu of a store bought solution?